More pictures of the organ
Here's some more pictures of my pipe organ.
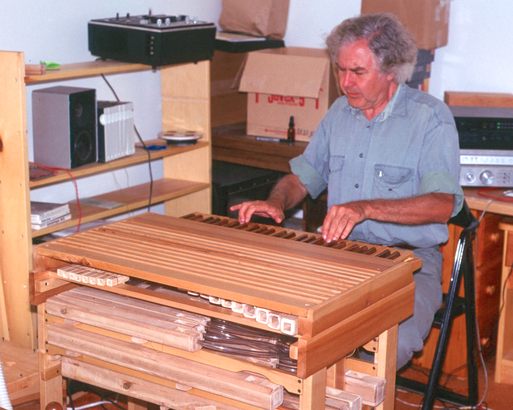 This is my uncle Rudi Heineman playing the organ. Rudi is a professor
of music in Berlin, specializing on pipe organs. He was actually
very impressed by this pipe organ, although I am sure it falls far behind
the organs he is used to playing. I think he was impressed by the
fact that it actually works, and is playable. He spent more than
a hour just playing random tunes on it.
This is my uncle Rudi Heineman playing the organ. Rudi is a professor
of music in Berlin, specializing on pipe organs. He was actually
very impressed by this pipe organ, although I am sure it falls far behind
the organs he is used to playing. I think he was impressed by the
fact that it actually works, and is playable. He spent more than
a hour just playing random tunes on it.
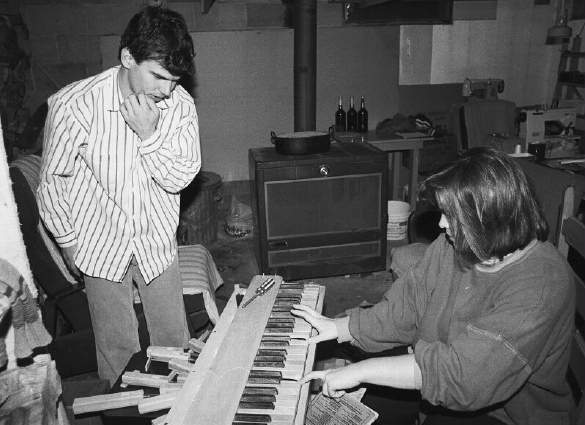 This is the organ set up in the basement, doing some early testing.
At this point, I had barely more than an octave of pipes, some of which you
can see spread on a stool behind the organ. At this point, it was already
fun to play around with, and both my sisters started trying out little tunes
from children's song books on it (none of us is terribly musically talented).
Here my sister is playing an octave, and I am probably trying to figure out
which notes are out of tune just by listening (I'm lousy at that!)
This is the organ set up in the basement, doing some early testing.
At this point, I had barely more than an octave of pipes, some of which you
can see spread on a stool behind the organ. At this point, it was already
fun to play around with, and both my sisters started trying out little tunes
from children's song books on it (none of us is terribly musically talented).
Here my sister is playing an octave, and I am probably trying to figure out
which notes are out of tune just by listening (I'm lousy at that!)
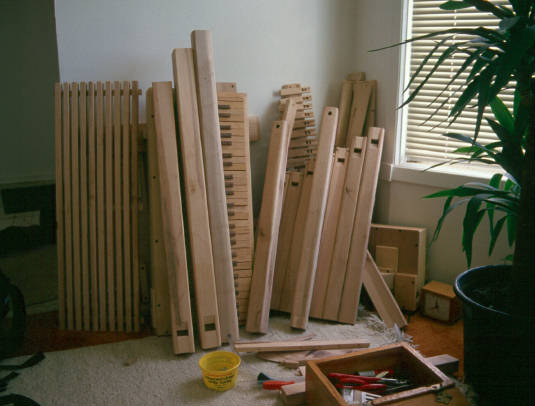 After the second time I went home and mostly finished all the pieces
of the organ, including the actual frame everything is attached to, I just
piled everything into the house, and this just looked like an interesting
still life, so I took the photo. The parts were there for quite a few days
while I varnished the frame parts on the front porch. Varnishing, if done
right, takes a lot of time for drying in between coats.
After the second time I went home and mostly finished all the pieces
of the organ, including the actual frame everything is attached to, I just
piled everything into the house, and this just looked like an interesting
still life, so I took the photo. The parts were there for quite a few days
while I varnished the frame parts on the front porch. Varnishing, if done
right, takes a lot of time for drying in between coats.
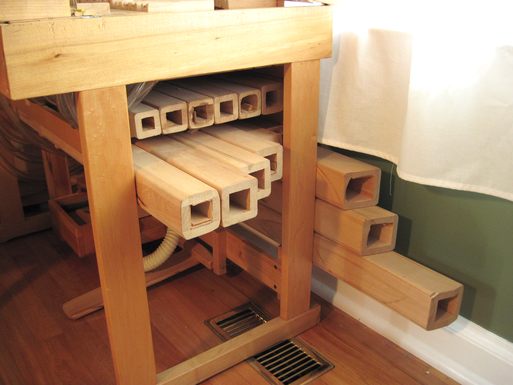
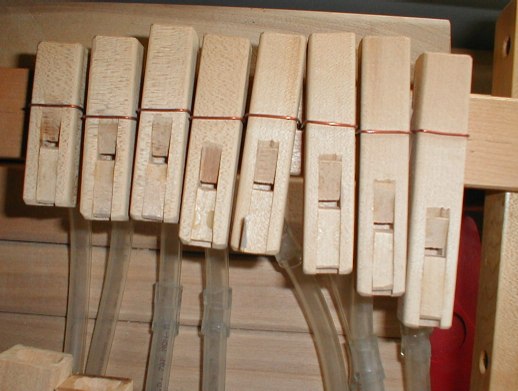 These are the troublesome high notes. The highest notes are the
most difficult to keep in tune, and the most prone to vary in pitch due
to variations in pressure and such. This probably has to do with
the aspect ratio of these pipes, being only about five times as long as
wide on the inside. I have pretty much given up on the highest 3
notes. The do produce monotonically increasing notes when played
in succession, but it could hardly be called part of any 'scale'.
These are the troublesome high notes. The highest notes are the
most difficult to keep in tune, and the most prone to vary in pitch due
to variations in pressure and such. This probably has to do with
the aspect ratio of these pipes, being only about five times as long as
wide on the inside. I have pretty much given up on the highest 3
notes. The do produce monotonically increasing notes when played
in succession, but it could hardly be called part of any 'scale'.
Also note the hoses being spliced with larger pieces of hose.
I added these pipes last, and I was using up what I had left of the plastic
hoses. I ended up using the smaller hoses when I 'rehosed' some of
the middle pipes to larger diameter hoses, because the hoses were restricting
airflow too much. It may sound a bit odd that the hose can restrict
airflow that much, but keep in mind that the organ operates at pretty low
pressures - much lower than the pressure one would use when blowing through
a straw for instance.
 These are the ends of some of the lower pipes. You can see the
various little blocks of woods I glued in some of the pipes because I cut
them too short. Everybody says that this adversely affects the sound,
but I don't think anybody has noticed when playing it yet. I just
didn't want to build all new pipes just because I cut the pipe a few millimeters
too short.
These are the ends of some of the lower pipes. You can see the
various little blocks of woods I glued in some of the pipes because I cut
them too short. Everybody says that this adversely affects the sound,
but I don't think anybody has noticed when playing it yet. I just
didn't want to build all new pipes just because I cut the pipe a few millimeters
too short.
The base pipes (you can see them on the right) are cut off at a slight
angle. That way, the opening faces away from the wall, and the pitch
is less affected when the organ is pushed flat against a wall.
 A view into the organ from the top, with the top row of pipes removed, and
the windchest cover aso removed. You can see a row of valves at the bottom
of the frame, and the ends of the plastic hoses that normally attach to the top
row of pipes which was removed for this photo.
A view into the organ from the top, with the top row of pipes removed, and
the windchest cover aso removed. You can see a row of valves at the bottom
of the frame, and the ends of the plastic hoses that normally attach to the top
row of pipes which was removed for this photo.
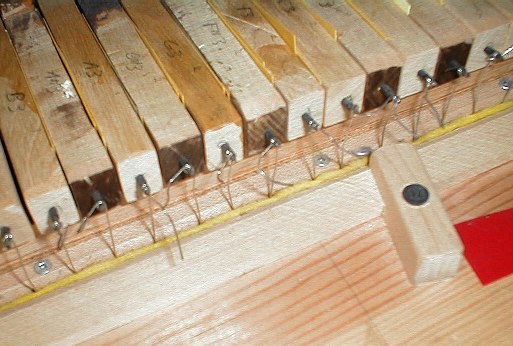 This is the back of the keys. Each key has a nail sticking out
of it, with a steel wire twisted around it. added some felt to where
the wire passes through the wood to cut down on air leakage a bit.
Also, when I stained the black keys, I also stained the back of them.
That way, when working on the back, its more obvious which note it is.
This is the back of the keys. Each key has a nail sticking out
of it, with a steel wire twisted around it. added some felt to where
the wire passes through the wood to cut down on air leakage a bit.
Also, when I stained the black keys, I also stained the back of them.
That way, when working on the back, its more obvious which note it is.
![]() The keys all pivot along the same shaft. Unlike a real organ, I don't have
a guide pin for every key. Instead, I just have plastic spacers between
the keys around the pivot. This isn't a perfect system. The keys can all
pivot side to side together a little bit. Also, in the summer, as the wood
expands a little, the keys become tight against each other, and I have to
take spacers out. Then, in the dry winter weather, I have to put them back in
to keep them from getting excessively loose.
The keys all pivot along the same shaft. Unlike a real organ, I don't have
a guide pin for every key. Instead, I just have plastic spacers between
the keys around the pivot. This isn't a perfect system. The keys can all
pivot side to side together a little bit. Also, in the summer, as the wood
expands a little, the keys become tight against each other, and I have to
take spacers out. Then, in the dry winter weather, I have to put them back in
to keep them from getting excessively loose.
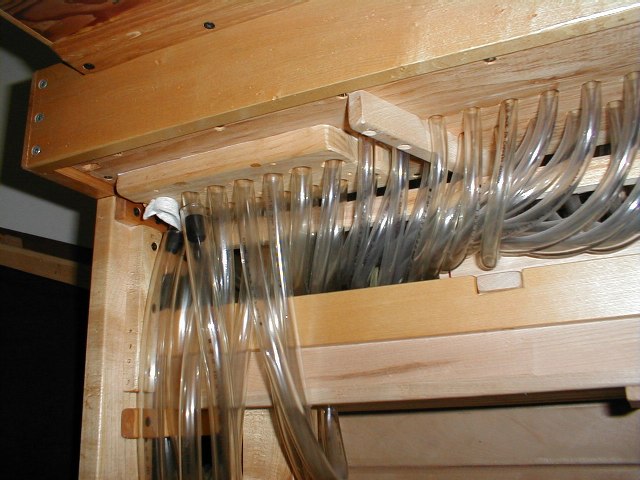 This is where all the hoses come out of the wind chest. Most
of the hoses are attached by just pushing them into a hole the same size
as the hose. For the base notes, I hat to go with larger hoses than
originally planned, as these require more airflow. I screwed another
block of wood to the bottom of it, which has larger holes drilled in, to
accommodate pushing larger hoses into it. For the very lowest notes,
I went with larger hoses still. On the leftmost two hoses visible,
you can see that the hose coming out of the wind chest immediately attaches
to an even bigger hose. These are simply slid into each other, with
electrical tape wrapped around the smaller hose to increase its diameter
enough to jam inside the larger hose.
This is where all the hoses come out of the wind chest. Most
of the hoses are attached by just pushing them into a hole the same size
as the hose. For the base notes, I hat to go with larger hoses than
originally planned, as these require more airflow. I screwed another
block of wood to the bottom of it, which has larger holes drilled in, to
accommodate pushing larger hoses into it. For the very lowest notes,
I went with larger hoses still. On the leftmost two hoses visible,
you can see that the hose coming out of the wind chest immediately attaches
to an even bigger hose. These are simply slid into each other, with
electrical tape wrapped around the smaller hose to increase its diameter
enough to jam inside the larger hose.